|
I was very busy lately and did not the news until the Twitter tag #BlokirKominfo was trending. Not just surprised, but I was shocked to find Steam, a platform where I bought over $1000 of games was blocked. After reading more news, I found out that PayPal was also blocked. This received massive online protest because many Indonesians are freelancers and received their salaries in PayPal. Therefore blocking PayPal, is the same as cutting of their income where if that is their only source of income, then they are threatened to be starved on the street. If that was not shocking enough, Yahoo was also blocked.
Authority ResponsibleThe Authority that governs Internet access is The Ministry of Information and Communication Indonesia. The reason is because the law that requires all online service providers to register as electronic system operator. The reason is to make sure Indonesian user data are protected and the online service does not violate Indonesian's Law. However, here is the catch that maybe true or false: online service providers are required to share Indonesian user data to the government. I learned that there are 2 main phases:
My Campaign Against Censorship
It all started when pornographic contents went viral among underage childrens. The government passed a law that any type of pornography is illegal. Then finally the authority started banning pornography websites and other contents. It was fine until this point, but I got annoyed when they started banning animations, anime, comics, manga, and other arts. Still this was tolerable and I only kept to myself my knowledge of bypassing this censorships. 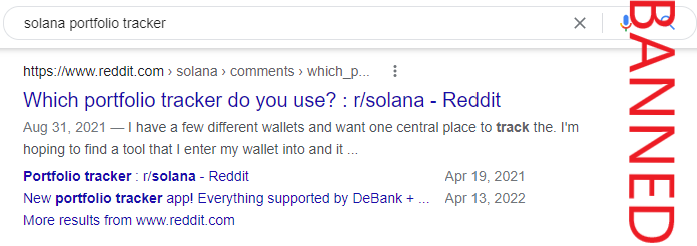
After that, they went too far. They started to ban Reddit just because there are pornography sections there, eventhough most of the contents are knowledgeable discussions. Although a decade have passed, they still blocked the whole website and not bother releasing partially of safe contents. Even when I needed additional information about DeFi portfolio trackers, I cannot obtain them because I cannot access its Reddit discussion. This is the start of campaign against censorship. 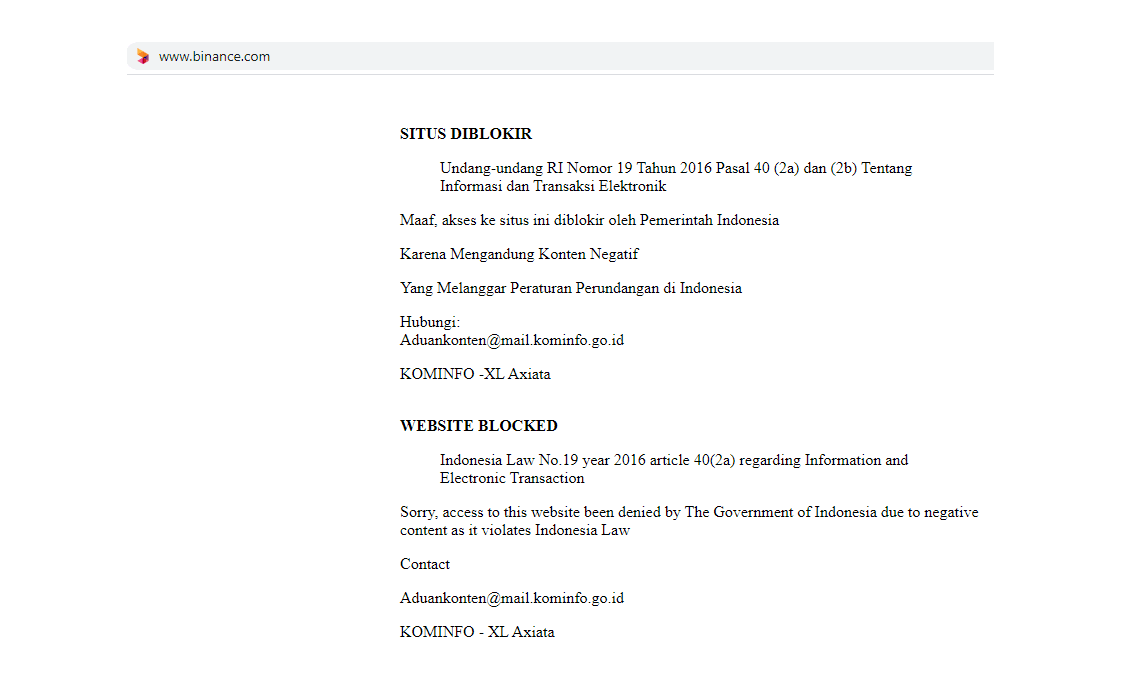
It gotten worse by targeting trading platforms such as Bybit and Bityard and even crypto platforms such as Binance. A very useful application that we can earn income by performing simple tasks such as participating in surveys and testing apps Cointiply may not be blocked but was removed from Indonesian mobile store. Today, citizens are finally protesting because these websites are blocked: What Can Regular Citizens Do?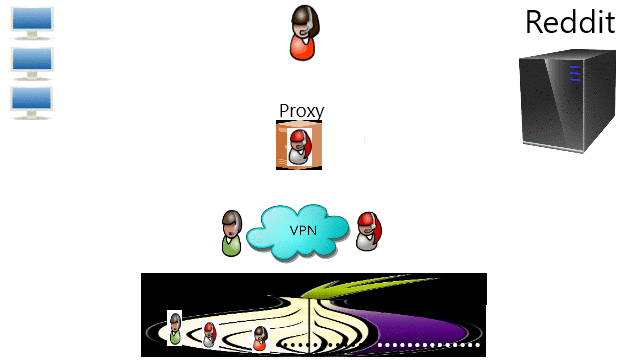
It was for this moment that I wrote a tutorial about Common Ways To Bypass Internet Censorship. The first method to try is by DNS because that is the simplest one with least performance issue. If that does not work than the second method is either through Proxy or VPN. The third method is through TOR if privacy is wanted. Providers should really consider migrating to decentralization such as blockchain technology and IPFS. Finally, the root problem is the tyranny that we should stand up to the authority.
0 Comments
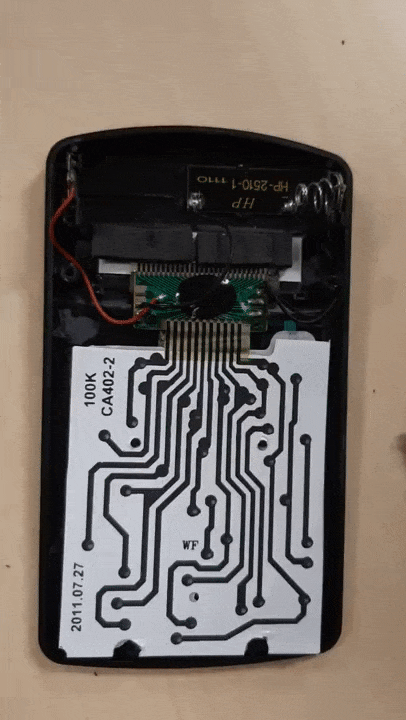
A mini mp3 player is a portable device to store and play electronic music files. With smartphones nowadays, many people no longer see a reason to get a mini MPEG-3 (mp3) player as smartphones have not only the same function and portability but even many more. However, some reasons still exist for people to own an mp3 player. First, mini mp3 players are much smaller than any mobile phones for those who likes to carry as little as possible and second, it is a good storage and utility for those who happens to have many mini secure digital (SD) cards. 
Mirrors


Mirrors


Mirrors

The applications maybe available on PC.If you are lucky, the applications are available on PC. Back then, my friends invited me to play Brave Frontier Global and I only owned Galaxy Tab 2 GT-P3100 which was very slow at playing the game. Then, I checked the game was available on Windows Microsoft Store and I overjoyed that I was able to play on PC with a faster speed then any other Android device out there. Android EmulatorIf the applications are not available on PC or any other consoles you have, then you really have to use an Android system. For example, Supercells games Clash of Clans and Clash Royale. There are various Android emulators out there, but the following emulators are the ones that I have tried. Leave a comment if you know about other Android Emulators. Bluestacks WindowsBluestacks runs smooth, fast, and all is well when playing almost any Android games. Since it is currently exclusive to Windows, I do not need to explain much where like any other Windows software, download from their website and install. You can navigate everything easily yourself. What I can offer in this article are only mentioning that there is Bluestacks and few videos you can skim through to see how the performance is on my laptop. Genymotion LinuxAs much as it went well on Bluestacks, unfortunately it is now available on Linux. I needed to find another, and the most popular one is Genymotion. This one needs an article because it is not like Windows where we only download and double click. Therefore, here are my following steps for installation based on my above video:
You may have no problem if you are using general Debian based Linux such as Ubuntu but for example in my case, I used Kali Linux, and frequently I had sound problems and lagging. The problem is either because of Genymotion or VirtualBox and I tried different devices and still it did not work. Android Operating SystemIf you cannot buy Windows and Android Emulators does not run well on your Linux, then your last option is installing Android Operating System (OS) on your PC. I did not follow the development of Android (OS) on PC but the last one I tried and worked well is Remix OS. Today Remix OS is discontinued and was proceed by other communities for example Phoenix OS which is better that there is a Windows installer and if you do not have Windows, you can download the .iso file and create a bootable usb installer using Etcher or other bootable driver creator. The installation step is almost the same as installing Ubuntu. Remix OS Virtual MachineIf you are curious or just not sure whether the installation will mess your system or not, you can try on a virtual machine first. If you just want to see of what is inside Remix OS, you can just download the pre-installed virtual machine image and import. I used VirtualBox here where you can install using "sudo apt install virtualbox" or download from its website. If you want to try the installation:
Remix OS on Physical Hard DriveAndroid Emulator and Virtual Box did not work well for me and the option I have left is installing an Android OS on my physical drive. You can always do the Ubuntu way where you create a bootable USB drive and install from there with maybe the following difference:
Another way is to install on existing Linux partition:
menuentry 'Remix OS' --class android-x86 {
    insmod part_gpt
    search --file --no-floppy --set=root /remix/system.img
    linux /remix/kernel root=/dev/ram0 androidboot.hardware=remix_x86_64 androidboot.selinux=permissive CMDLINE SERIAL=random
    initrd /remix/initrd.img
}
If you are lazy like me in creating a bootable drive like on my above video, you can continue from the above step not for running Remix OS but for running the Remix OS installer and make sure you have an empty partition ready:
menuentry 'Remix OS' --class android-x86 {
    insmod part_gpt
    insmod gzio
    insmod part_msdos
    insmod ext2
    set root='(hd0,msdos6)'
    search --file --no-floppy --set=root /RemixOS/system
    linux /RemixOS/kernel root=/dev/ram0 androidboot.hardware=remix_x86_64 androidboot.selinux=permissive SRC=/RemixOS CMDLINE SERIAL=random
    initrd /RemixOS/initrd.img
}
Finally, I can play Clash Royale and Brave Frontier on my PC smoothly which was slow when using Genymotion Linux Emulator or VirtualBox. I can even play both game simultaneously. Brave Frontier have auto battle feature. 


sudo dpkg --add-architecture i386
sudo apt update
sudo apt full-upgrade
Playstation 1 PCSXR
sudo apt install pcsxr 
Playstation 2 PCSX2
sudo apt install pcsx2 

Legal Status

SummaryThis guide serves for administrators in large institutions who needs to upgrade their Moodle version to the latest version. Administrators usually forgets to upgrade their Moodle and the problem is that the web interface connects to Moodle developer's server and attempts to upgrade to the latest version directly where as time passes, this does not work due to the administrators' Moodles' version far behind the latest version. If I am not wrong, the web interface will show that the upgrade button is no longer supported due to the far behind version and asked to upgrade manually. 
My Server Specifications
I have the following packages installed: sudo apt install apache2 mysql-server php php-mysql php-xml php-curl php-zip php-gd php-mbstring php-xmlrpc php-soap php-intl If using newer version like php7, I recommend to install php5 stable along side it because we are handling older version of Moodle, so follow https://lornajane.net/posts/2016/php-7-0-and-5-6-on-ubuntu: sudo add-apt-repository ppa:ondrej/php sudo apt update sudo apt install php5.6 php7.0 Here is an example command to switch from php7 to php5.6 sudo a2dismod php7.0 sudo a2enmod php5.6 sudo service apache2 restart Backup your Moodle
sudo cp -rv /var/www/yourmoodledata /var/www/yourmoodledatabackup
sudo cp -rv /var/www/html/yourmoodle /var/www/html/yourmoodlebackup
sudo mysqldump -u root -p yourpassword yourmoodle.sql > yourmoodle.sql
For safety try on a duplicate moodle first or ignore this suggestion if you are confidentsudo cp -rv /var/www/html/yourmoodle /var/www/html/youmoodleduplicate sudo cp -rv /var/www/html/yourmoodledata /var/www/yourmoodledataduplicate sudo chown -R www-data /var/www/html/yourmoodledataduplicate sudo mysql -u root -p create database yourmoodleduplicate; quit mysql -u root -p yourmoodleduplicate < yourmoodle.sql
Delete Any Moodle CustomizationUnfortunately I didn’t succeed in upgrading customized moodle, you have to download fresh moodle and replace your current moodle directory. I like using git here. cp -v /var/www/html/yourmoodleduplicate/config.php /var/www/html/config.php rm -rv /var/www/html/yourmoodleduplicate If using git: git clone git://git.moodle.org/moodle.git /var/www/html/yourmoodleduplicate cp -v /var/www/html/config.php /var/www/html/yourmoodleduplicate/config.php cd /var/www/html/yourmoodleduplicate && git checkout MOODLE_19_STABLE If not, download moodle 1.9 stable (depending on your start) and name it /var/www/html/yourmoodleduplicate. Convert Database to UTF8Access from your browser your moodle site for example http://localhost/yourmoodleduplicate. Login to your administrator account and follow the instructions. It may ask you for some unicode stuff to your moodle database. If so follow instructions here https://docs.moodle.org/32/en/Converting_your_MySQL_database_to_UTF8: mysqldump -u root -p your password -c -e --default-character-set=utf8mb4 --single-transaction --skip-set-charset --add-drop-database -B --no-data yourmoodledatabase > dump.sql sed -i.bak -e 's/DEFAULT CHARACTER SET latin1/DEFAULT CHARACTER SET utf8mb4 COLLATE utf8mb4_unicode_ci/' -e 's/DEFAULT CHARSET=latin1/DEFAULT CHARSET=utf8mb4/' dump.sql sed -i.bak2 's/ENGINE=InnoDB/ENGINE=InnoDB ROW_FORMAT=DYNAMIC/' dump.sql mysql -u root -p yourpassword < dump.sql mysqldump -u root -p yourpassword -c -e --default-character-set=utf8mb4 --single-transaction --skip-set-charset --add-drop-database -B --no-create-info yourmoodledatabase > data.sql mysql -u root -p yourpassword < data.sql If it’s asking for more php dependencies then install for example if it asks for php curl then “apt install php5.6-curl”. Login to your administrator account again after finishing. Upgrade to Moodle 2.2Download next higher stable version of fresh moodle and replace your current moodle directory. I like using git here and if using git: cd /var/www/html/yourmoodleduplicate && git checkout MOODLE_22_STABLE If not, download moodle 2.2 stable and replace /var/www/html/yourmoodleduplicate. Access from your browser your moodle site for example http://localhost/yourmoodleduplicate. Login to your administrator account and follow the instructions. Login to your administrator account again after finishing. Upgrade to Moodle 2.7Download next higher stable version of fresh moodle and replace your current moodle directory. I like using git here and if using git: cd /var/www/html/yourmoodleduplicate && git checkout MOODLE_27_STABLE If not, download moodle 2.7 stable and replace /var/www/html/yourmoodleduplicate. Access from your browser your moodle site for example http://localhost/yourmoodleduplicate. Login to your administrator account and follow the instructions. Install dependencies if it asks. Login to your administrator account again after finishing. Upgrade to Moodle 2.9Download next higher stable version of fresh moodle and replace your current moodle directory. I like using git here and if using git: cd /var/www/html/yourmoodleduplicate && git checkout MOODLE_29_STABLE If not, download moodle 2.9 stable and replace /var/www/html/yourmoodleduplicate. Access from your browser your moodle site for example http://localhost/yourmoodleduplicate. Login to your administrator account and follow the instructions. Install dependencies if it asks. Login to your administrator account again after finishing. Change database to innodbIt may ask to change your database engine to innodb, follow instruction here http://www.woblag.com/2012/04/moodle-php-script-to-convert-mysql.html: Create a script for example yourscript.php:
<?php
// WARNING: PLEASE TEST BEFORE RUNNING ON A PRODUCTION DATABASE
// Tested on Moodle 1.9 and Moodle 2.0/2.2
//
// Disclaimer:
//
// This script was written to be executed from the command line in
// Linux using a MYSQL database
// and MYISAM storage engine. It converts the storage engine to
// INNODB using the ALTER TABLE command.
//
// It assumes that the INNODB engine has been enabled.
// This can be confirmed by logging into the mysql prompt
// and running the command:
// show engines;
//
// If it is disabled, check your my.cnf and
// comment out the line: skip-innodb
//
// It does not check if disabled, so the script would execute
 //and attempt to co
// It contains secure information, so DO NOT PLACE IN WEB DIRECTORY
//
// Execute from /temp and delete afterwards
//
// This is a modification of a script located here:
// http://stackoverflow.com/questions/3856435/how-to-convert-all-tables-from-myisam-to-innodb
//
// Version : 1.2
// Date  : 11 April 2012
// Diff  :  check for recordset before executing alter table
//
// Version : 1.1
// Date  : 31 January 2012
// Diff  :  Added Timer to script; Display user and DB being affected
//
//
// Version :  1.0
// Date  : 25 January 2012
//
//
//
// Noveck Gowandan http://noveckg.blogspot.com

//Time Calculation - start count

$time = explode(' ',microtime());
$time = $time[1] + $time[0]; //return array
$begintime = $time; //define begin time

//Your database connection items here

$host = 'myhost'; //Specify host
$dbuser = 'myuser'; // Specify user with alter permissions
$dbpass = 'mypass'; //user password
$mydb = 'mydb'; //specify schema or db to be modified


//connect to database using variables above
$link = mysql_connect($host,$dbuser,$dbpass);
$db = mysql_select_db($mydb);

if (!$link) {
die('Could not connect: ' . mysql_error());

}
echo "Connected Successfully to: $host." . "\n\n";
echo "Using database: $mydb." . "\n\n";
echo "Running script as $dbuser." . "\n\n";


//show tables in database
$sql = 'SHOW TABLES';
$rs = mysql_query($sql);

echo $sql;
echo "\n";

if (!$rs) {
die('SQL Recordset Error: ' . mysql_error());

}
else {
//loop through tables and convert to InnoDB
while($row = mysql_fetch_array($rs))
{
$tbl = $row[0];
$sql = "ALTER TABLE $tbl engine=InnoDB;";
mysql_query($sql);

echo $sql;
echo "\n";
}

echo 'Operation Completed.' . "\n\n";
echo 'Confirm Storage Engine conversion using phpmyadmin ' . "\n" . 'or from mysql: show create table tblname.' . "\n";

}
//close connection
mysql_close($link);

$time = explode(" ", microtime());
$time = $time[1] + $time[0];
$endtime = $time; //define end time
$totaltime = ($endtime - $begintime);
echo "Script Execution Time: $totaltime" . " seconds." . "\n\n";


?>
For me, php5.6 works: php5.6 yourscript.php Continue with Moodle upgrade on the web. Upgrade to Moodle 3.2Download next higher stable version of fresh moodle and replace your current moodle directory. I like using git here and if using git: cd /var/www/html/yourmoodleduplicate && git checkout MOODLE_32_STABLE If not, download moodle 3.2 stable and replace /var/www/html/yourmoodleduplicate. Access from your browser your moodle site for example http://localhost/yourmoodleduplicate. Login to your administrator account and follow the instructions. Install dependencies if it asks. Login to your administrator account again after finishing. 
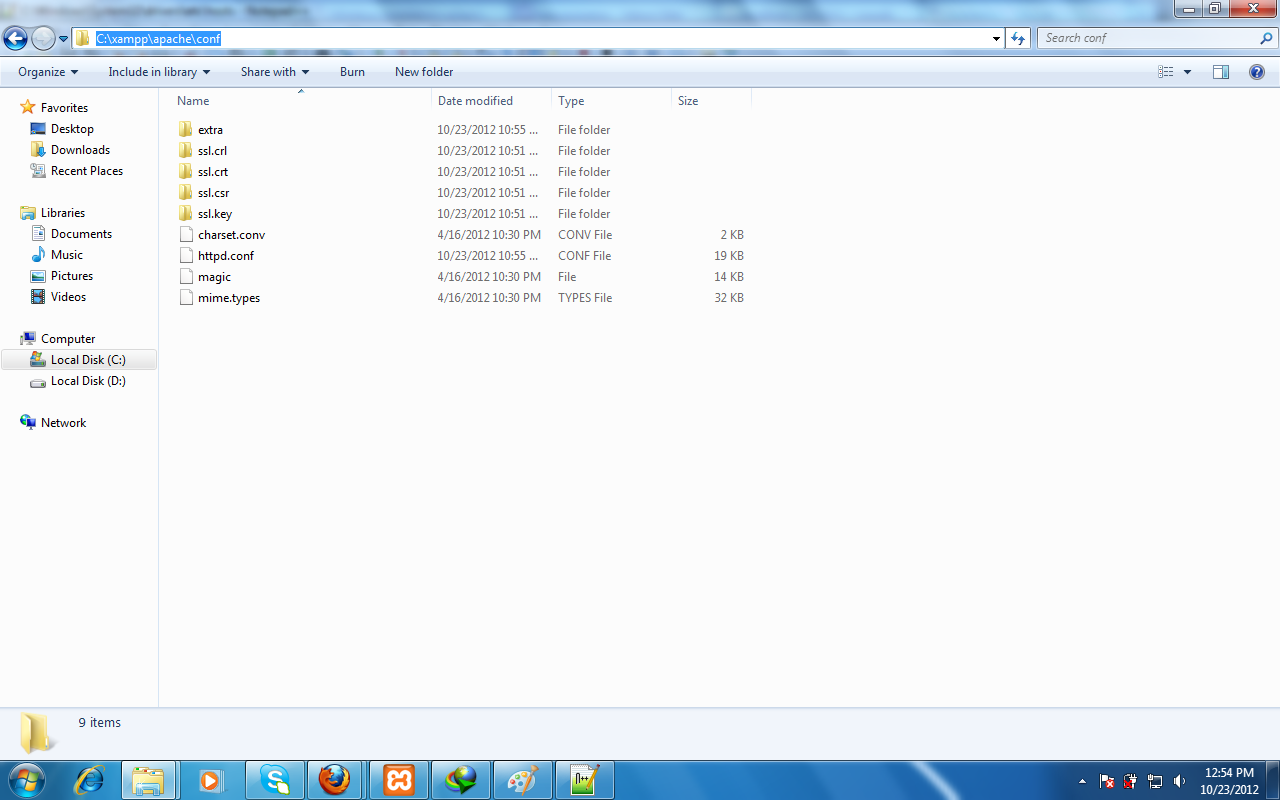
In my previous guide, I wrote a tutorial of installing Moodle learning management system (LMS) on my preferred server operating system (OS) for general users Ubuntu, a Debian based Linux. If you really do not want to try Ubuntu and go ahead with Windows, here I provide a tutorial that was my undergraduate assignment in 2013. Yes, it is behind times but they are still similar where you can maneuver the difference yourself. Another side, if this tutorial does not serve as a guide, then it can serve as a memory for those who are curious of how XAMPP 1.8.1 and Moodle 2.3.2 is back then. Download XAMPP on http://www.apachefriends.org/en/xampp-windows.html , and install. Open the control panel if already install, apache and mysql is necessary for localhost. 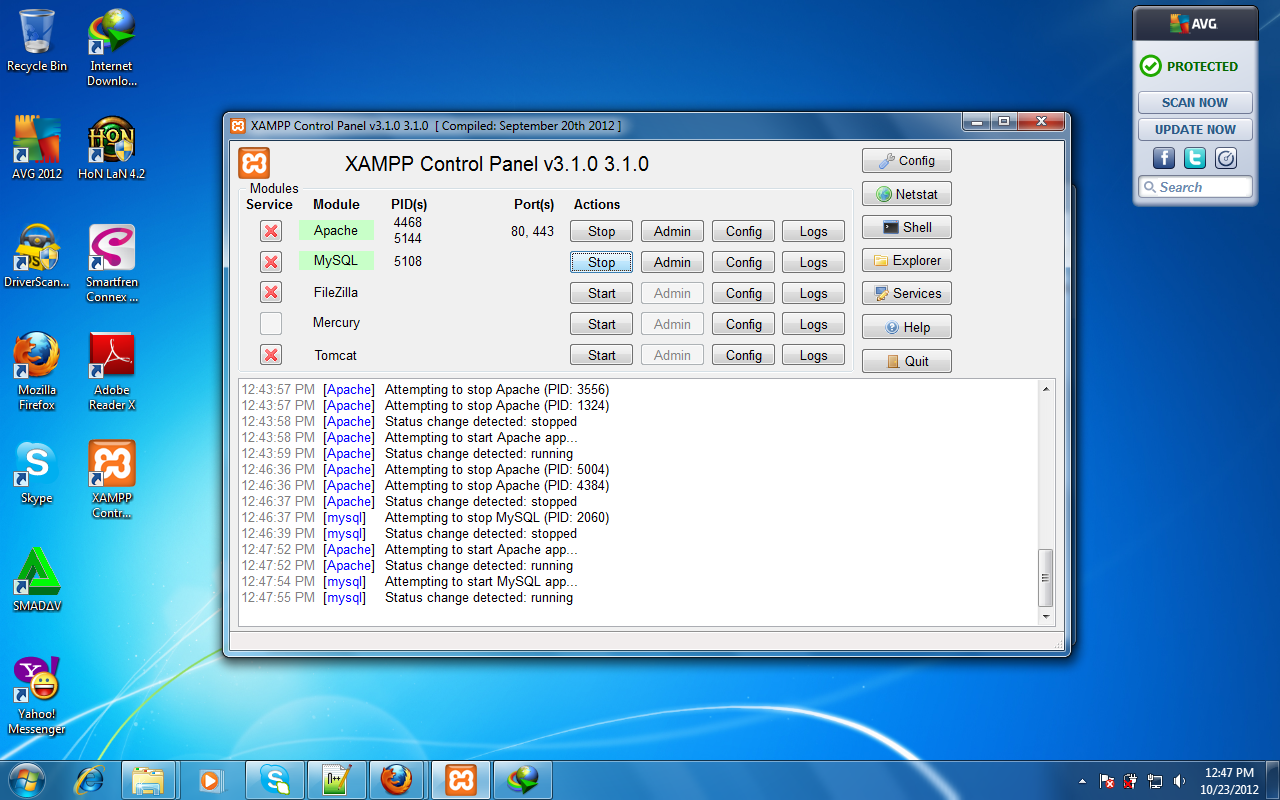
Open your browser and type http://localhost, if succeeded it should look like below. 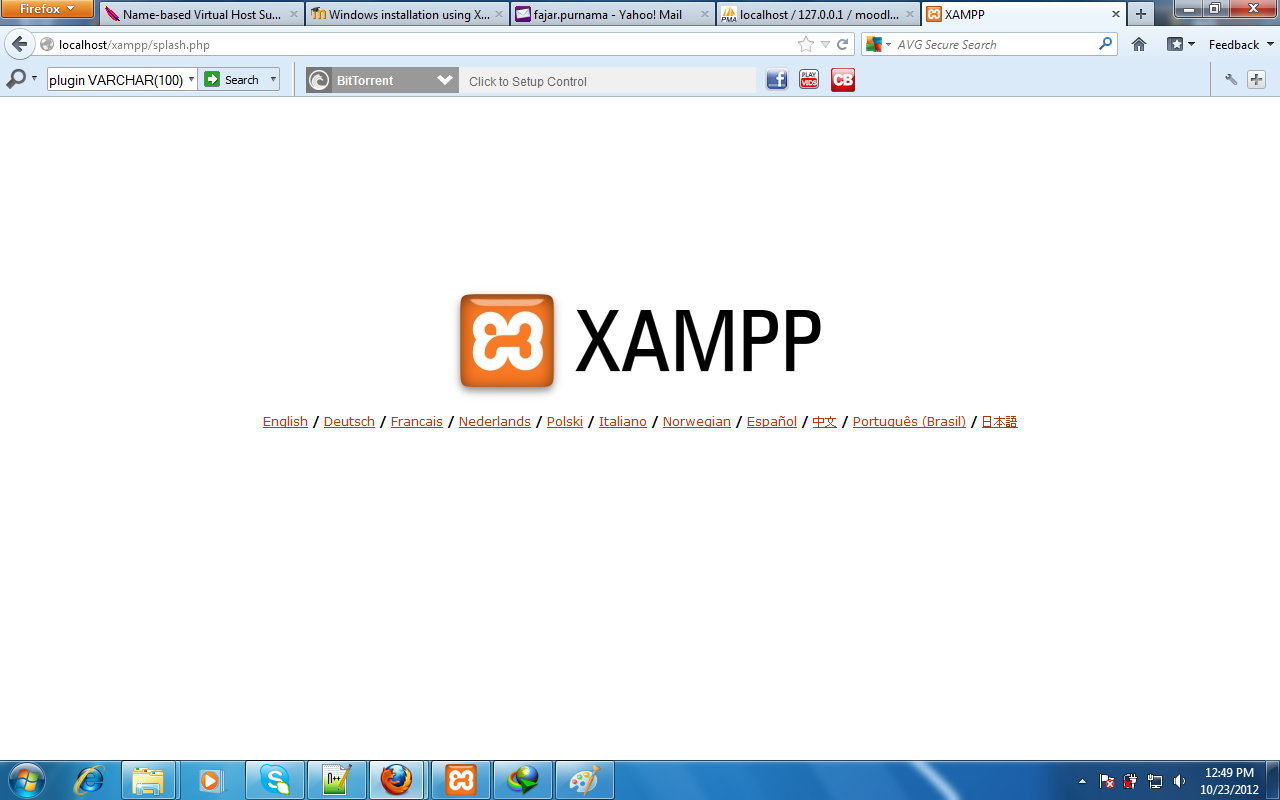
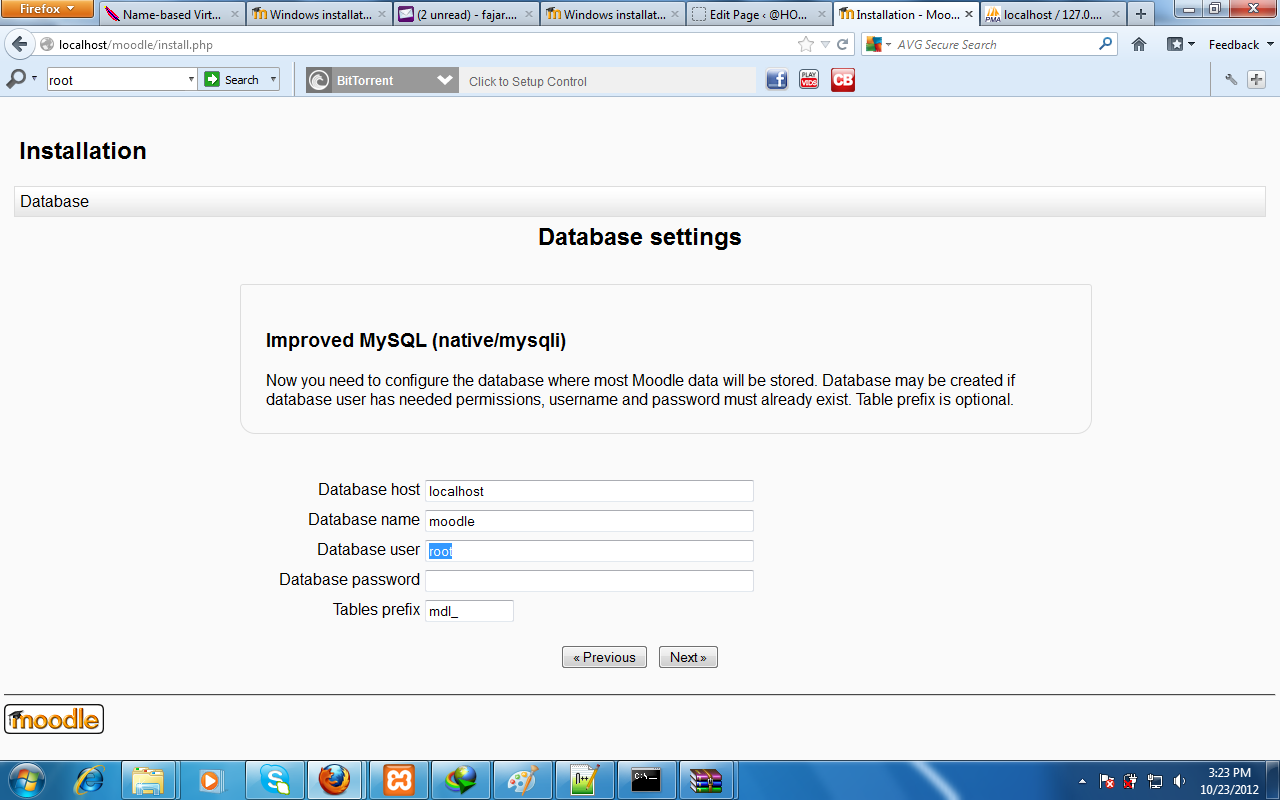
Open http://localhost/phpmyadmin Go to database and add your moodle's database. 
Download Moodle at https://download.moodle.org/ and extract them to C:xampp\htdocs 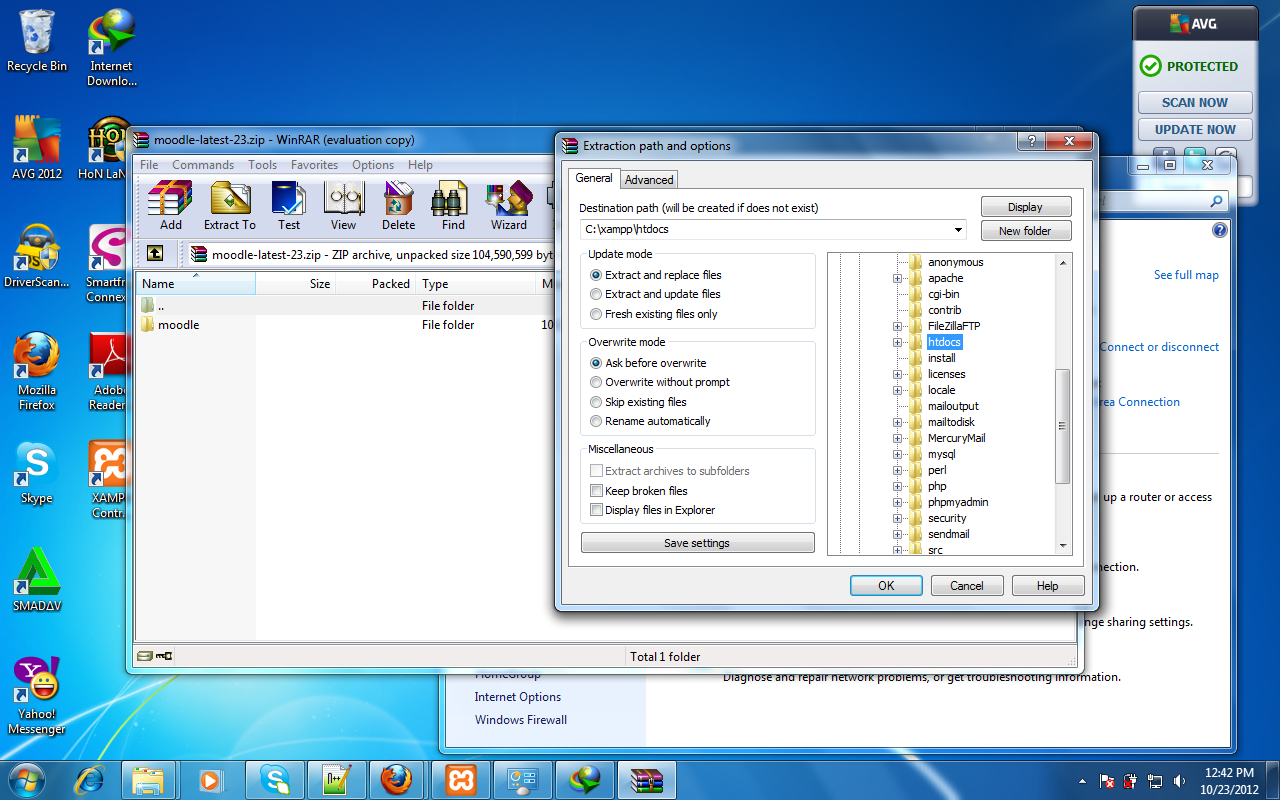
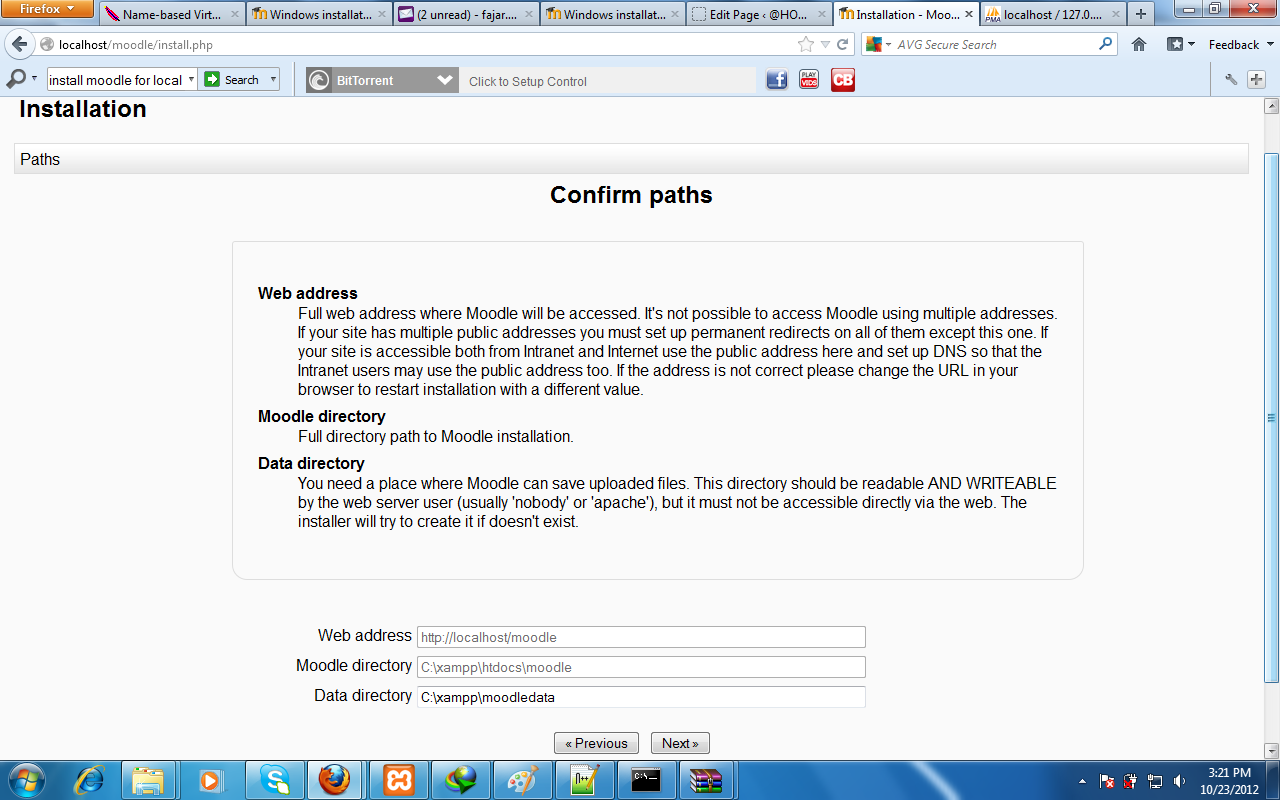
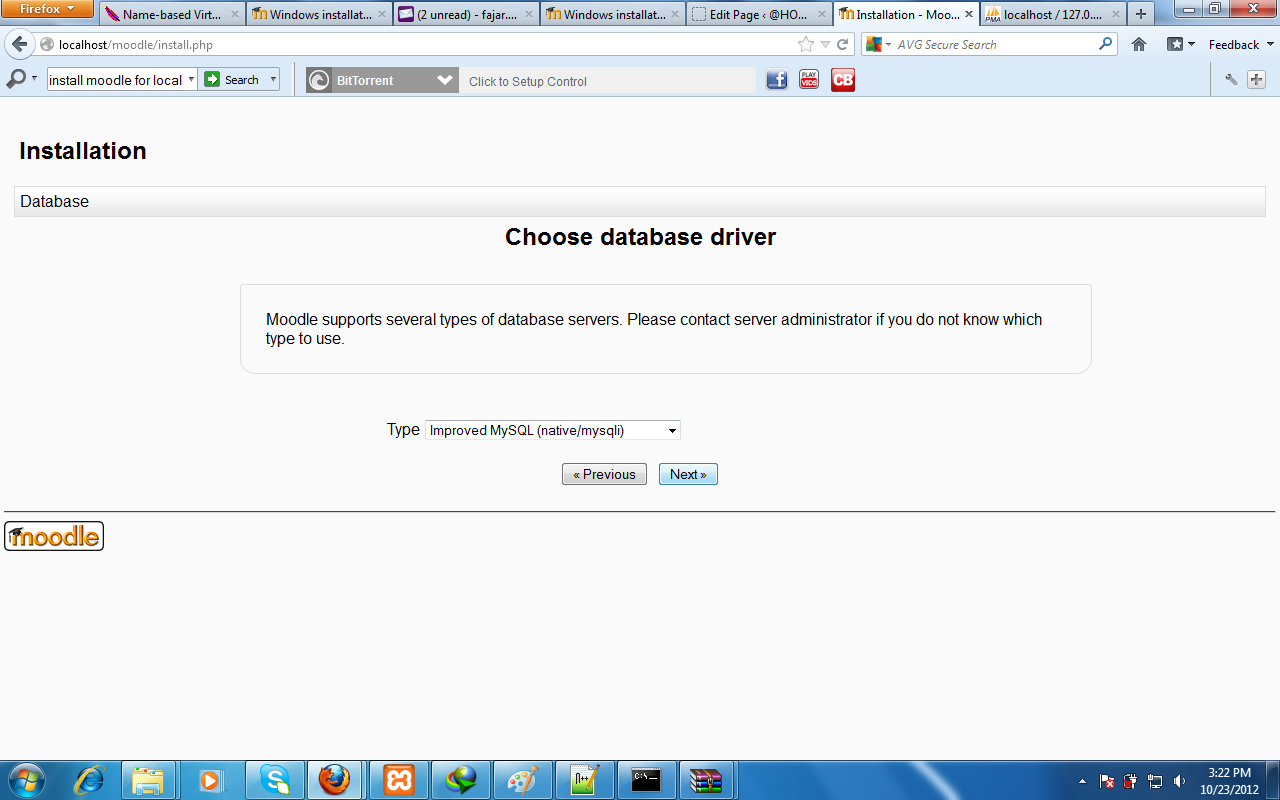
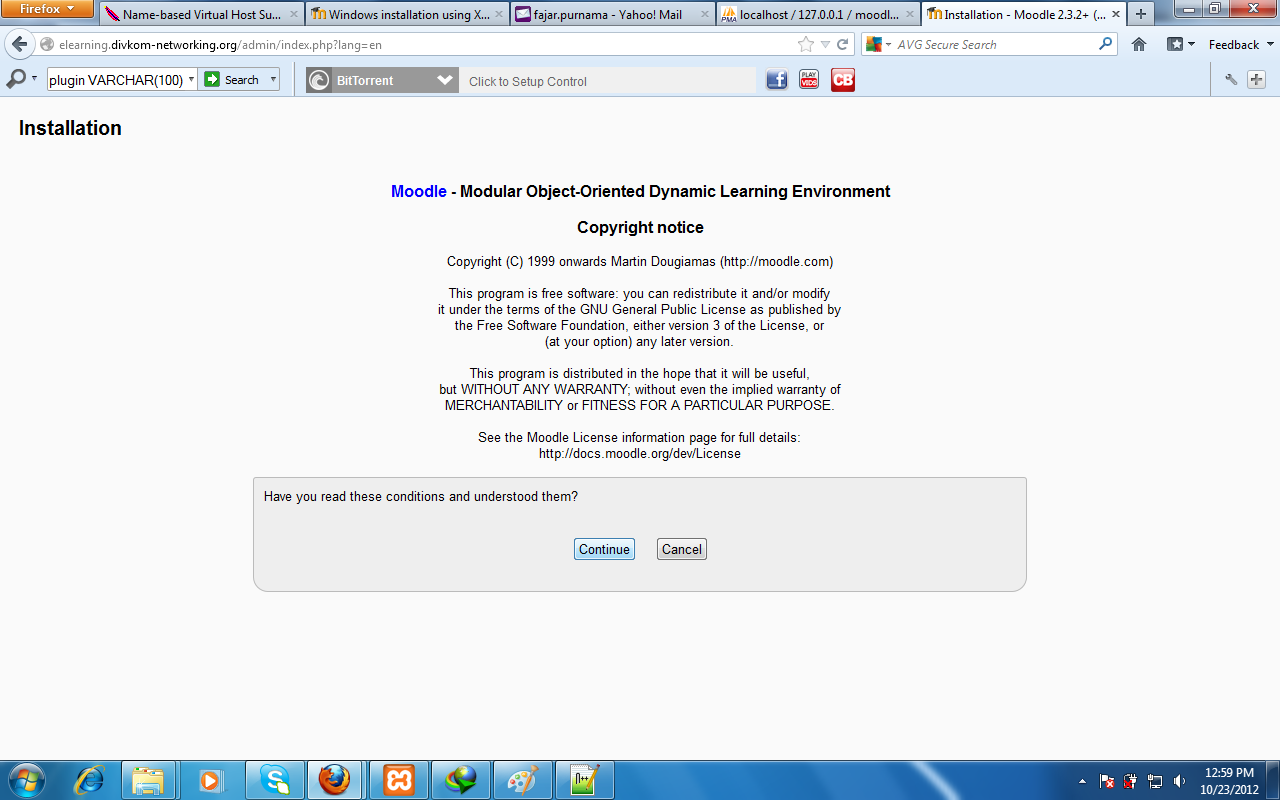
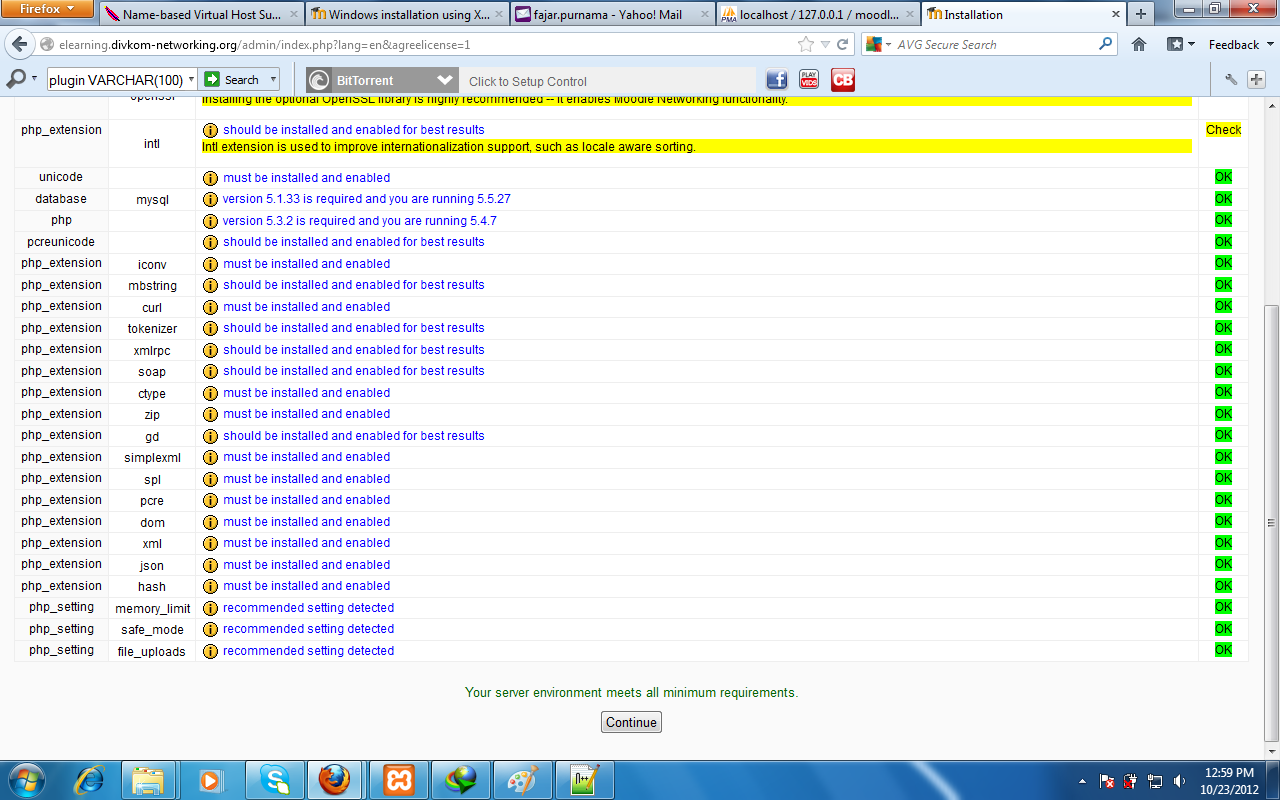
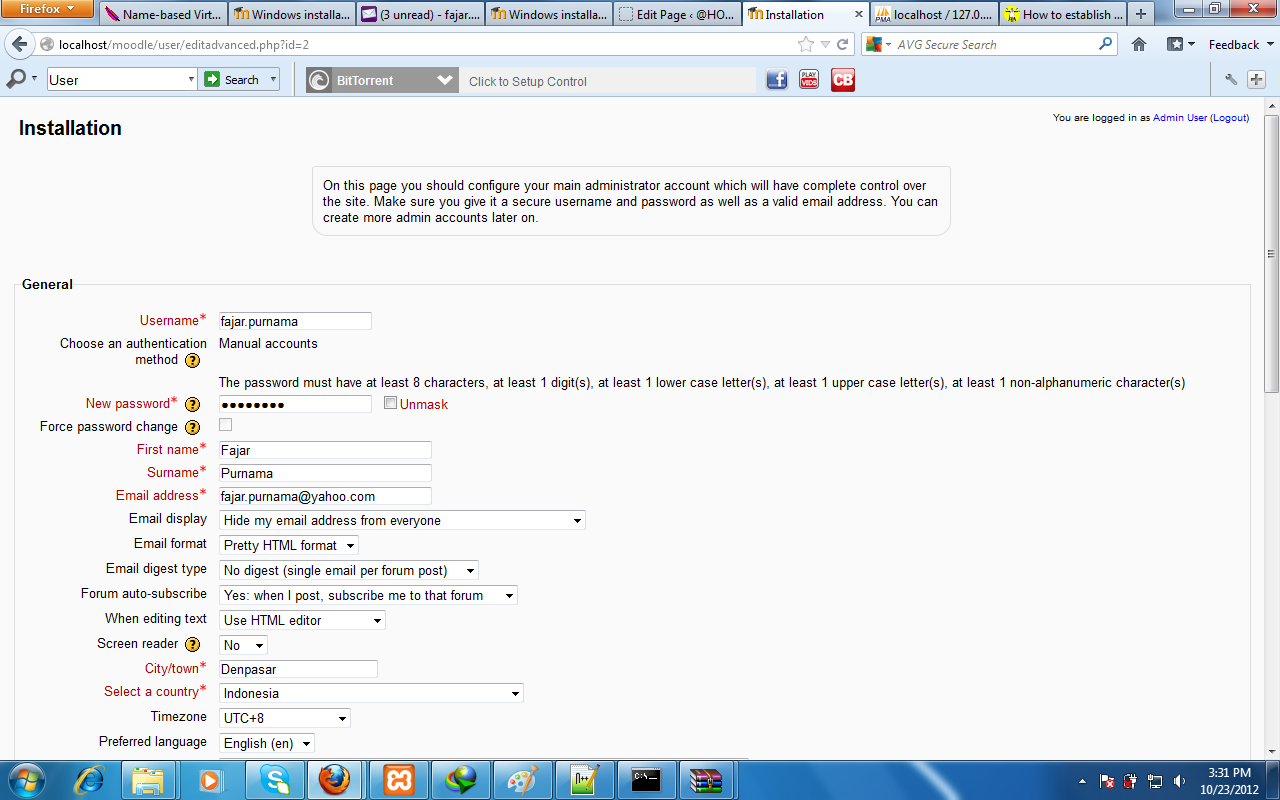
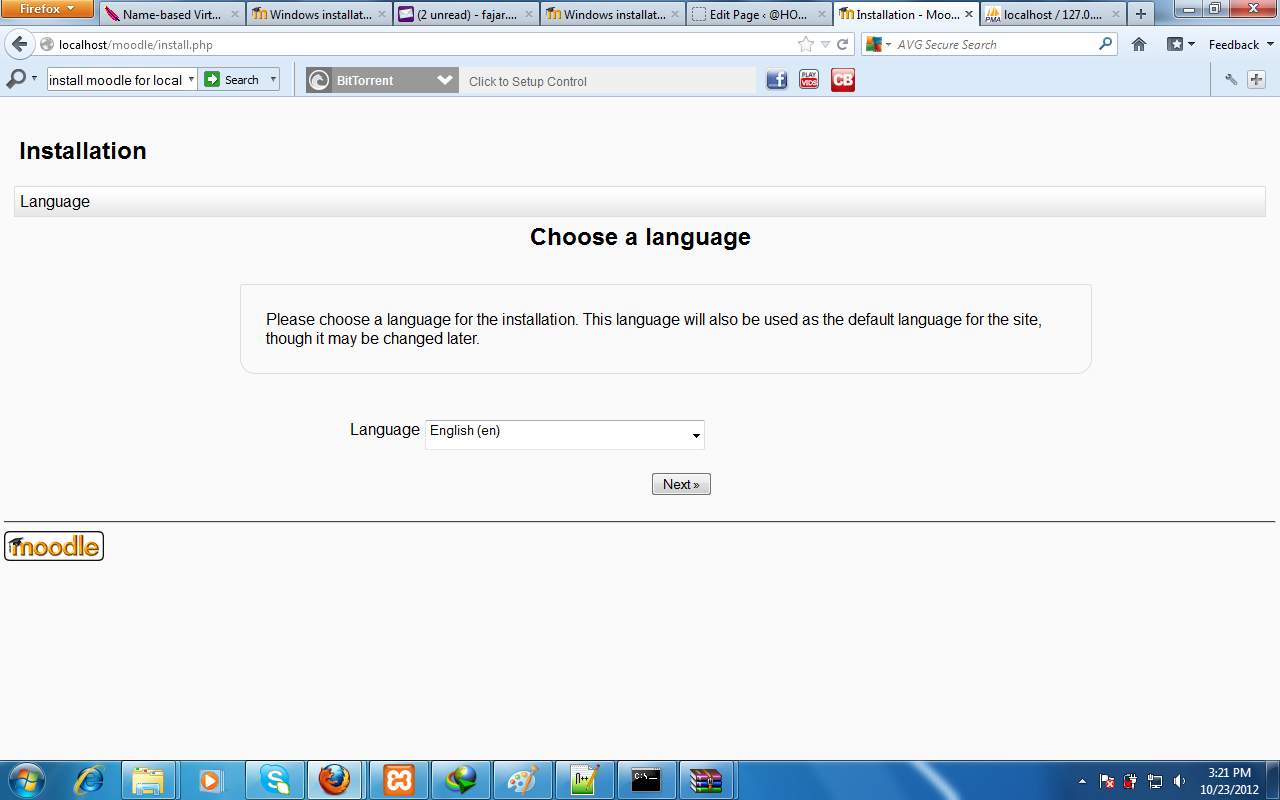
On your browser open http://localhost/moodle and follow the installation which should be similar to my previous guide with just different version. 
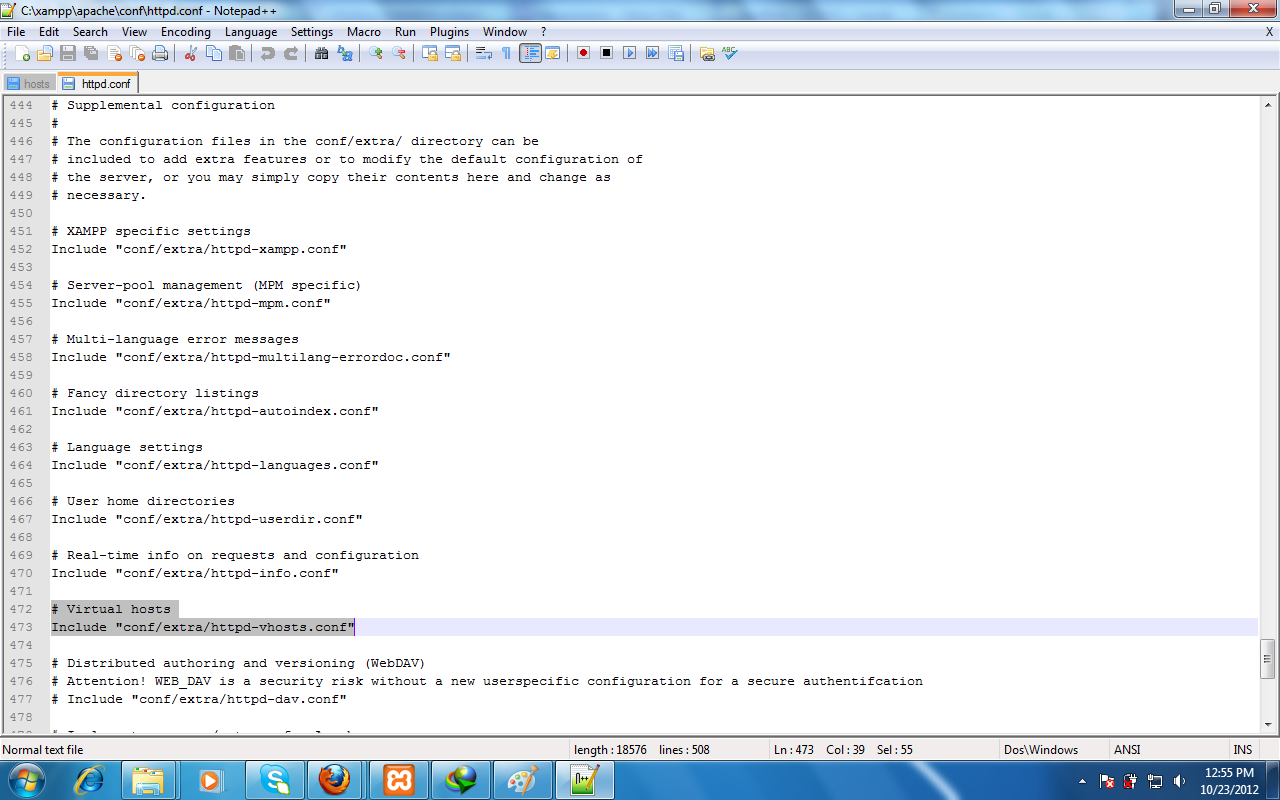
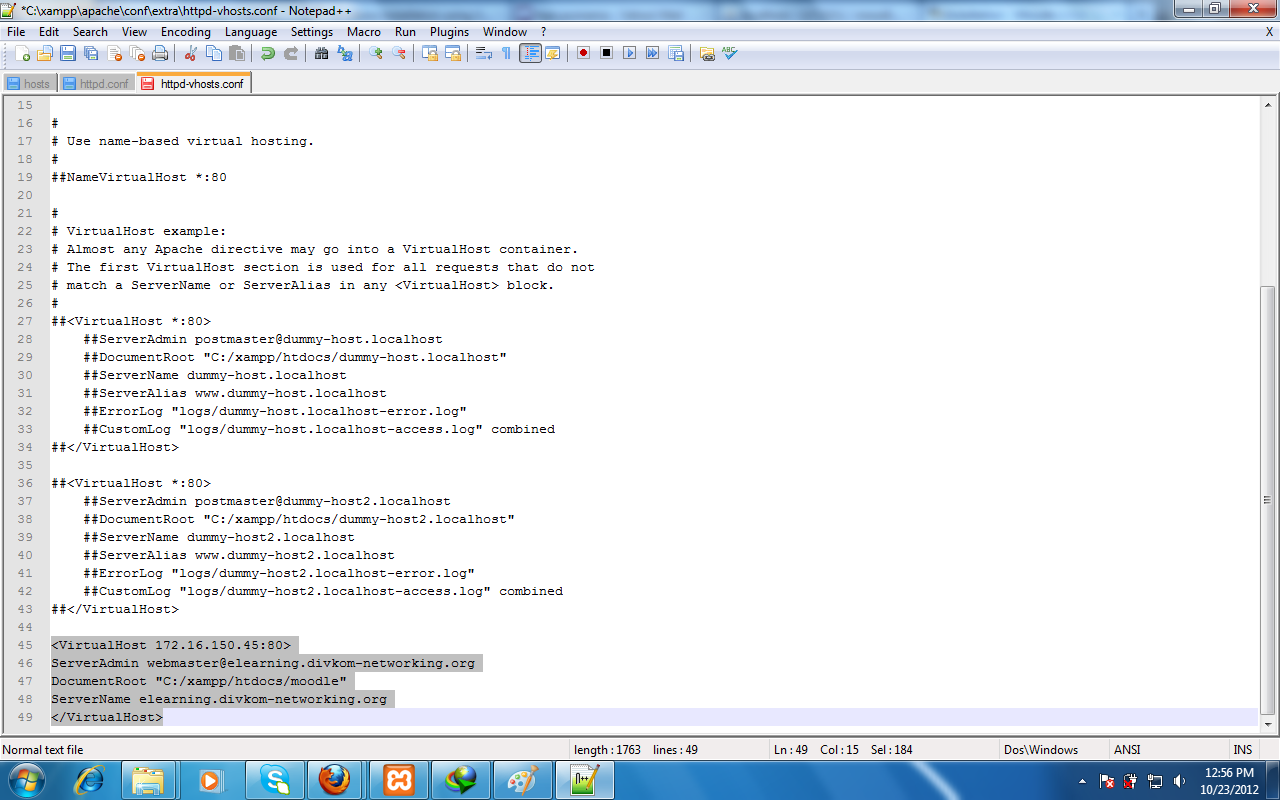
For moodle to be available in local area network open with notepad C:xamppmoodle\config.php and change the following line: $CFG->wwwroot = 'http://localhost/moodle'; to your ip address, $CFG->wwwroot = 'http://172.16.150.45/moodle'; DON'T FORGET "http". That was my mistake. Oh and today it is "https" so do keep up with modern times. 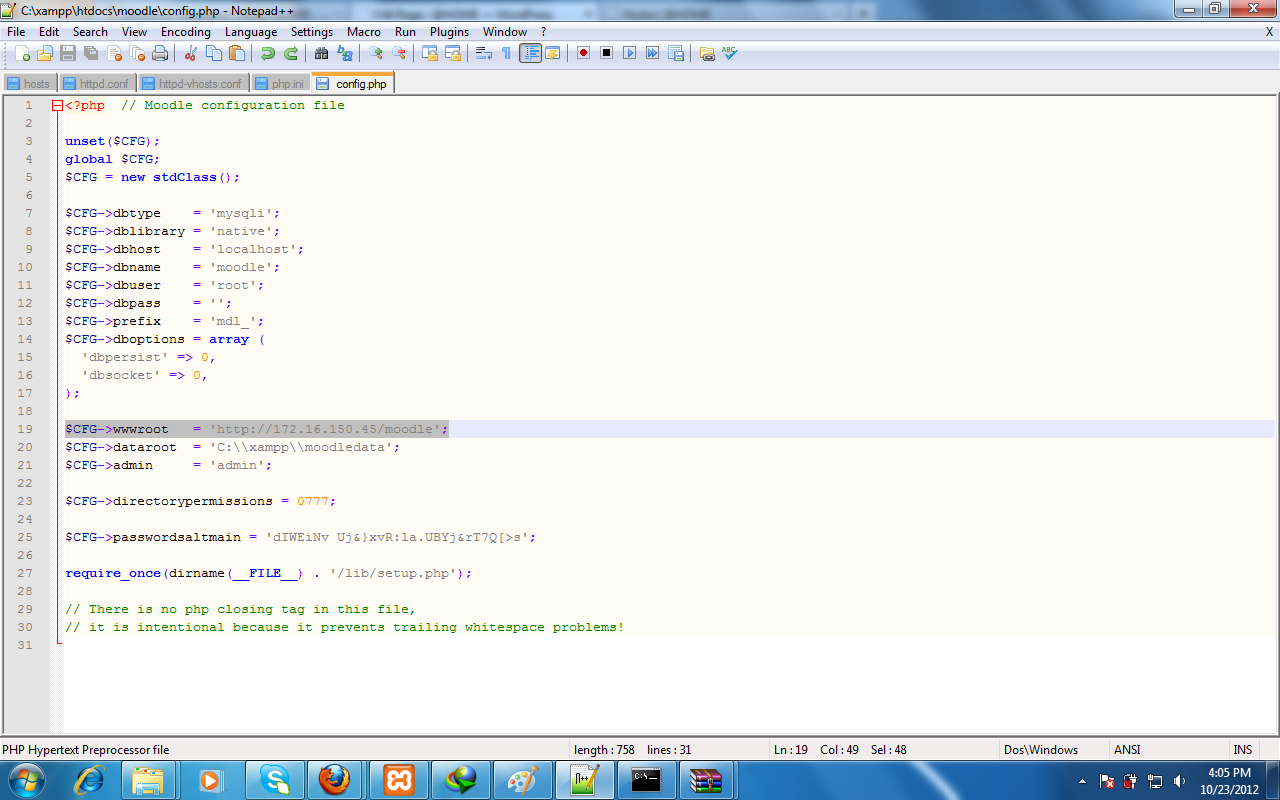
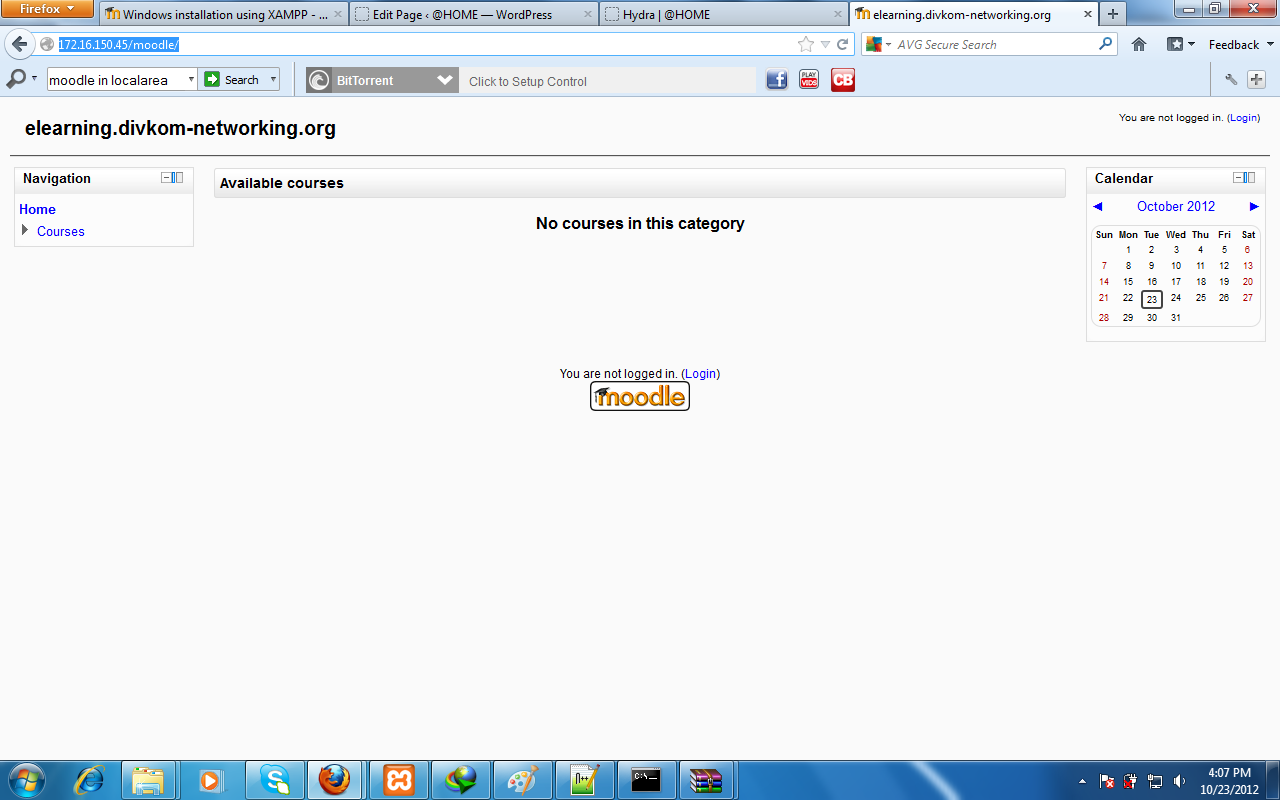
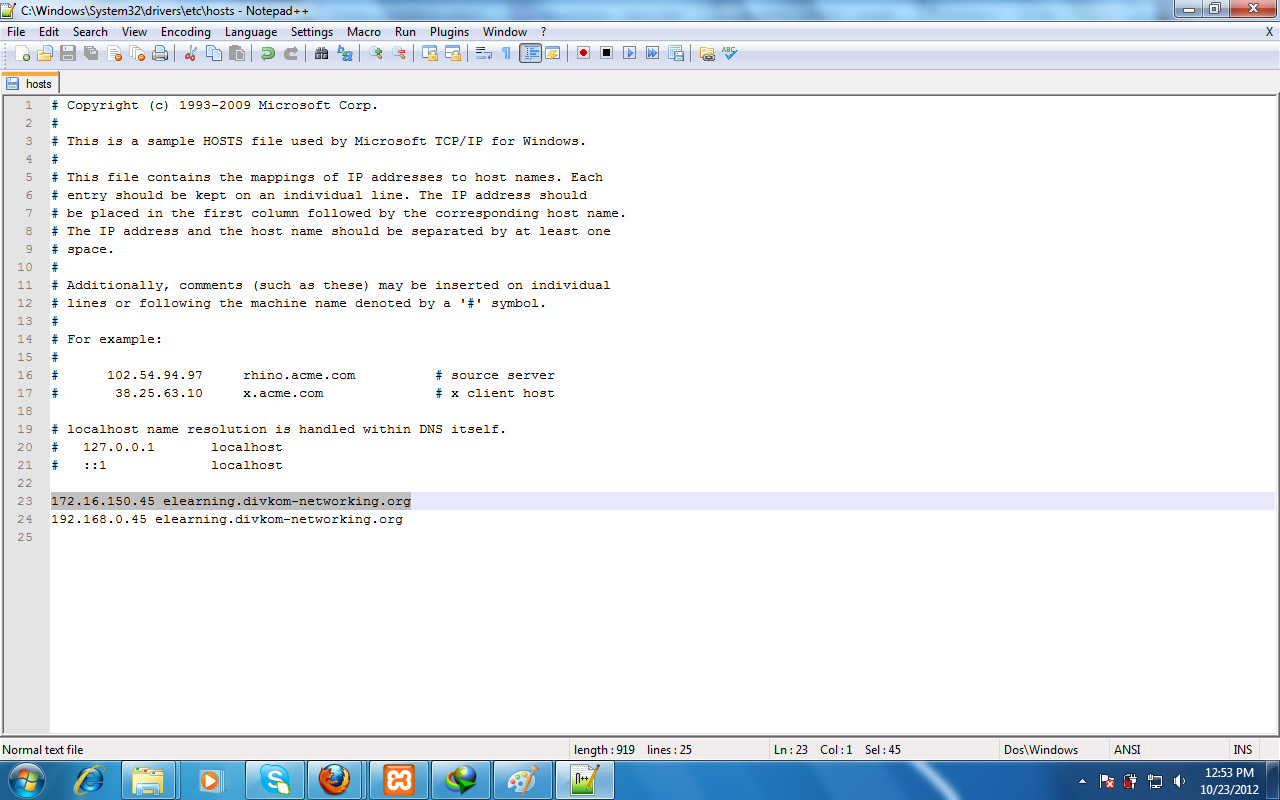
If you don't know how to configure IP address, go to previous tutorial. Back in my undergraduate course, I was also asked to run Moodle on a local domain. Therefore, the following steps are additional but optional: 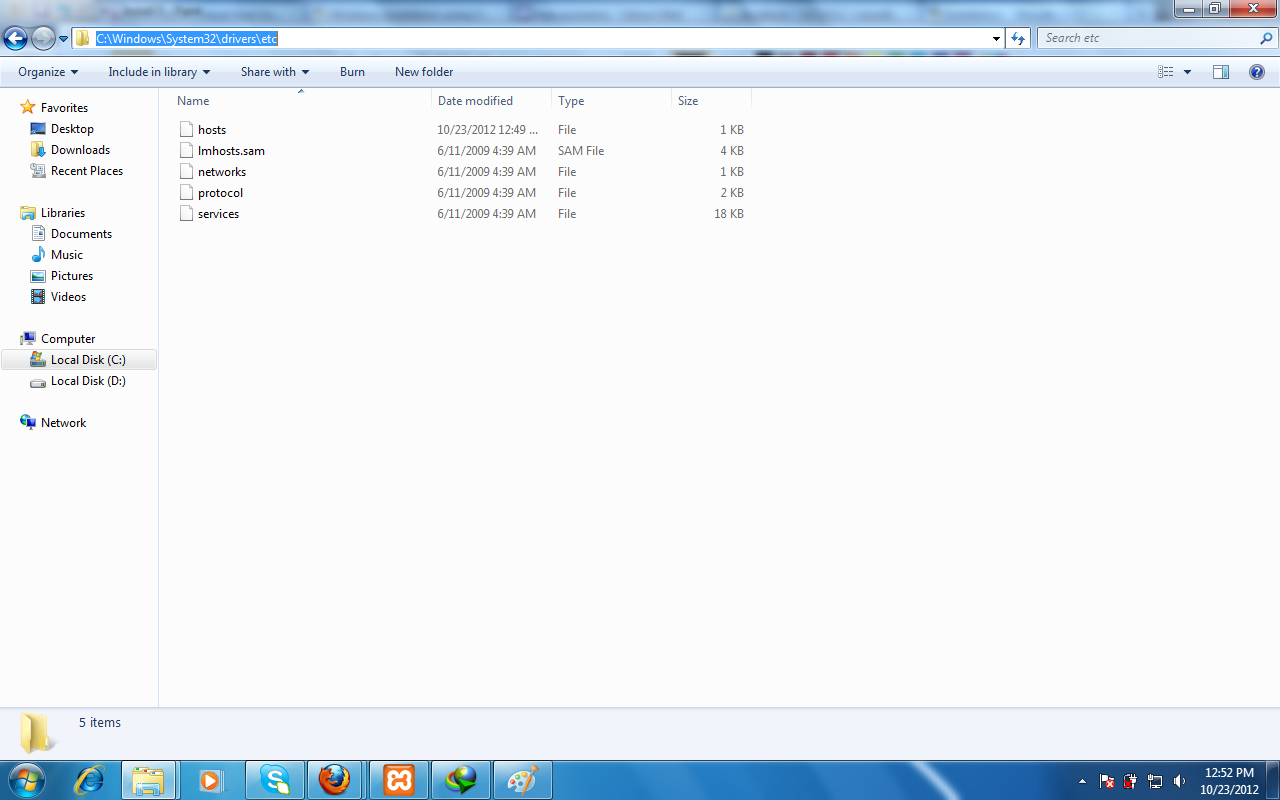
Moodle Brief IntroductionMoodle is one of the most popular learning management system (LMS) that provides online learning services. Student's read materials, conduct discussions, submit assignments, and attempt quizzes from outside the class and on the other side, teachers can provide materials, grade, evaluation, and other forms of management. Moodle does not necessarily have to replace traditional face to face learning but can be blended to make tradional learning more convenient just as implemented on the Universities that I graduated from which are Udayana University and Kumamoto University. As technology advances, online and distant learning is no longer exclusive to big institutions with specialized technicians. Today, everybody can try and install Moodle in their computers and experiment their own local computer based learning. No special skill is needed but just some experience working with servers and web based applications. In fact, we do not need those skills since the installation guide is available here. For now, the Moodle installation here is in Ubuntu Linux as it is the most popular operating system (OS) for servers for general users. If you have not install Ubuntu or other Debian based Linux, you can follow my previous guide or wait for my future guide in Windows. Installing The ServerBefore anything else, make sure the Debian Linux is updated by entering the following command in terminal: sudo apt update && sudo apt full-upgrade There are three main packages needed to install the server:
Use any web server and database server you want. Here Apache2 and MySQL is used because they are the most popular among general users. The following packages are enough for Moodle installation today: sudo apt install apache2 mysql-server php php-mysql php-xml php-curl php-zip php-gd php-mbstring php-xmlrpc php-soap php-intl If the packages above are not found then ask your OS's community for similar packages for example maybe php-mysql does no work but php7.0-mysql does. If you do not like using command line then bear with me with just one command line to install a graphical user interface (GUI) package manager Synaptic if your distribution does not have a built-in one: sudo apt install synaptic 
If the servers are not automatically started, then enter the following commands: sudo service apache2 start sudo service mysql start 
Installing MoodleDownloading and Placing the Files
Before that, /var/www/html and its surrounding directory can only be modified by administrator account or root. Either do them in the terminal or open your filemanager using root for example mine using nautilus file manager: sudo nautilus In summary:
If you know how to use git, this step is preferred.Moodle is ever developing and it is easier to upgrade it using git rather than downloading the new version everytime and cleaner than upgrading from the web browser. Feel free to skip this step if you want and follow the previous but if you want long term convenient management then get moodle from git: sudo apt install git cd /var/www/html sudo git clone git://git.moodle.org/moodle.git cd moodle sudo git branch -a sudo git checkout (your preferred version which is usually the latest for example:) sudo git checkout MOODLE_310_STABLE Moodle Web Installation

Right click /var/www directory, properties and change the permission to allow all (not recommended) or: sudo chmod 777 /var/www Right click /var/www directory, properties and change ownership and group to www-data (not my best) or: sudo chown www-data:www-data /var/www Create moodledata folder in /var/www directory manually, right click moodledata, properties and change ownership and group to www-data (my best solution) or: sudo mkdir /var/www/moodledata sudo chown www-data:www-data /var/www/moodledata 

Right click /var/www/html/moodle directory, properties and change the permission to allow all (not recommended) or: sudo chmod 777 /var/www/html/moodle Right click /var/www/html/moodle directory, properties and change ownership and group to www-data (not recommended either) or: sudo chown www-data:www-data /var/www/html/moodle Create config.php file in /var/www/moodle directory manually, right click config.php, properties and change ownership and group to www-data and after installation, return the ownership to root (not the best) or: sudo touch /var/www/moodle/config.php sudo chown www-data:www-data /var/www/moodle/config.php (after installation:) sudo chown root:root /var/www/moodle/config.php Create config.php file in /var/www/moodle directory manually, edit config.php and paste the script shown on the installation (the best solution) or: sudo (your preferred editor) /var/www/moodle/config.php (mine is:) sudo gedit /var/www/moodle/config.php 

Video GuideIf you are missing some details, maybe my videos can help you with timestamp available. Installation takes 30 minutes and the rest are exploration post installation. Mirrors
|
Archives
August 2022
Categories
All
source code
old source code Get any amount of 0FP0EXP tokens to stop automatic JavaScript Mining or get 10 0FP0EXP tokens to remove this completely. get 30 0FP0EXP Token to remove this paypal donation. get 20 0FP0EXP Token to remove my personal ADS. Get 50 0FP0EXP Token to remove my NFTS advertisements! |
 RSS Feed

